There’s a gazillion game server providers out there that’ll help you host your own Minecraft server where you will have a pretty control panel (typically Multicraft or McMyAdmin) that you’ll barely use. This all comes at a steep premium with prices varying wildly. In this day of extremely cheap VPS hosted in the cloud, you might want to try running your own.
Before we continue…
This guide is meant as a no-nonsense, full guide for anyone with access to a computer. While experience with bash or any other CLI’s is a big plus, it should not be required as I’ll be providing all the commands you need. Like every guide in software, these commands may need to change over time as versions change. If you encounter an issue with these steps feel free to leave a comment and I’ll try to respond as soon as possible.
1. Creating the VPS
1.1 Choosing your Cloud Provider
A VPS (or Virtual Private Server) is as the name implies your own virtualised server. You’ll have full access to this device. Since the advent of cloud providers, these prices have dropped to unseen levels, where you can run a stable modded Minecraft server for 10 people for less than a euro per player, per month. If you run vanilla Minecraft, these prices will drop to cents per player.
There’s many VPS providers, personally I only have experience with OVH and Hetzner, but there’s many more out there with the big names being AWS and Google Cloud.
I receive no compensation for advertising any of these so please make your own informed choice. I’ll be basing this guide on my personal favourite: Hetzner. All the steps in regards to creating the actual VPS will be based on them, but should be similar for whichever you choose.
1.2 Setting up the VPS
Once you’ve created an account go to your Cloud Console and create a new project. The name isn’t terribly important, I went for “MC VPS”.

After creating the project you’ll get a big red button “ADD SERVER”. Click this and choose the location closest to you and your future Minecraft buddies. For the OS select Debian. You can choose something else here, but this guide will be based around Debian. Distro’s based on Debian such as Ubuntu should work fine too.
Next, you’ll need to pick the specifications of your VPS. This is something you’ll have to try a bit. Typically in the beginning you’ll be fine with one of the smaller options, but as the server grows and chunk loaders become widely used you might want to scale up. For now, I’d go for a nice mid-sized server such as this:
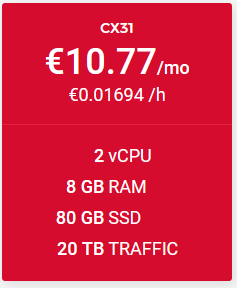
Don’t be afraid to experiment! You only pay for the time this server is created. So if you use it for an hour and then decide to delete it, you’ll have paid 0,01694 EUR. If you follow this guide, get fatally stuck and want to start over, simply delete the server and create a new one.
Scroll all the way down and decide whether you want them to create backups for you or not. It’s a 20% increase to the price so you may want to just download the server backups yourself regularly.
While you really should use an SSH key to authenticate to your server, creating the key is kind of out of scope for this guide. Simply leave it empty and choose a name for your server. Much like the project name, it’s not very important. I went with “mc-server”. Click “Create & Buy Now” at the bottom of your screen. Shortly after you’ll receive an email that will look something like this:
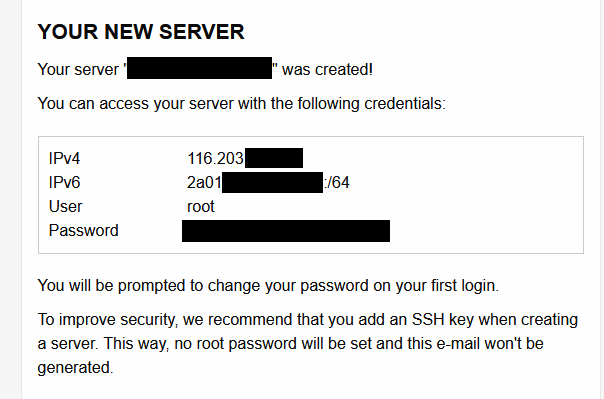
Congratulations, you now have a VPS!
2. Connecting to the VPS
You can connect to the VPS using SSH, a popular SSH client is PuTTY. You can download PuTTY here (you’ll need putty-64bit-0.72-installer.msi). After installing, open PuTTY and fill in the IP address you received from Hetzner. You can save the session by giving it a name and clicking Save. Press “Open”, you should receive a security alert, warning you the host key wasn’t seen before. Press Yes to accept.
Your username will be root, the password was in the e-mail you received upon creating the VPS. (to paste in the terminal: either right click, or press shift + insert.
3. Creating the Minecraft user
While technically an optional step, this will make messing up your machine a lot more difficult. At the command prompt, type:
adduser minecraft
And press enter. Follow the little wizard and choose a password. Remember this password as you’ll be using it later on.
4. Installing the necessary dependencies
At the command prompt (still as root), type the following two commands:
apt update
apt install -y screen unzip
The “screen” utility will allow you to keep your server running after you close the SSH session.
As you probably know, Minecraft runs on Java. To run Java you’ll need a Java Virtual Machine (JVM) which is contained in a Java Runtime Environment (JRE). Most modpacks today only run on Java 8, or at least have pre-configured performance optimizations only compatible with Java 8.
We’ll be installing OpenJDK 8, an open-source alternative to Oracle Java. This version has disappeared from the Debian 10 repositories, so you’ll have to add a repository yourself. The complete steps are written on the official AdoptOpenJDK page. I find them to be a bit outdated, so I’ll write them down here as well:
wget -qO - https://adoptopenjdk.jfrog.io/adoptopenjdk/api/gpg/key/public | sudo apt-key add -

apt install -y software-properties-common

add-apt-repository --yes https://adoptopenjdk.jfrog.io/adoptopenjdk/deb/

apt-update

apt install -y adoptopenjdk-8-hotspot-jre
After this, verify that you have Java properly installed by typing:
java -version
You should get something similar to:
root@mc-server:~# java -version
openjdk version "1.8.0_222"
OpenJDK Runtime Environment (AdoptOpenJDK)(build 1.8.0_222-b10)
OpenJDK 64-Bit Server VM (AdoptOpenJDK)(build 25.222-b10, mixed mode)
If you’ve gotten here, you’re 10 minutes out from running your own Minecraft server!
5. Installing the (modded) Minecraft Server
From here on out you shouldn’t need the root user anymore. Either log in with PuTTY as the different user, or type the following as root:
su - minecraft
Once logged in, you can install Minecraft. First create a directory where we’ll be running our server from:
mkdir ftb
cd ftb
This guide will choose the FTB Revelation pack as an example. On the pack homepage you can find the correct Server Pack, make sure to select the latest version and once again copy the link.
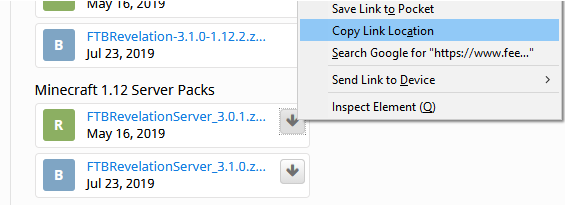
Now enter the following command, changing the URL to the latest version.
wget 'https://www.feed-the-beast.com/projects/ftb-revelation/files/2712063/download' -O server.zip
After the download completes, unzip the archive:
unzip server.zip
Now install Minecraft:
sh FTBInstall.sh
And agree to the EULA which you should read over here by entering the following command:
echo "eula=true" > eula.txt
If you don’t do this, you’ll get this error:
[minecraft/ServerEula]: Failed to load eula.txt
Now you can run your Minecraft Server! First create a screen, this will be a little terminal-in-terminal that will contain your Minecraft console.
screen -S Minecraft
Then run the startup script:
sh ServerStart.sh
This will take a couple of minutes, your screen will show thousands of yellow and red warning messages and you’ll probably ignore them all, which is fine! Once the screen stops spewing logs and shows “Preparing Spawn Area” you’ll know the server is ready to join! Simply fire up your Minecraft and connect to the server IP.
You can safely minimize the Minecraft server screen by pressing ctrl + A + D (yes, that’s three keys at a time). To go back to your screen type:
screen -rd
If for any reason you have multiple screens running, you can get back to the correct one by typing
screen -rd Minecraft
(this was named by the -S option earlier)
After starting up for the first time, the server.properties file got generated. You can edit this on the command line with an editor like Nano, simply type “nano server.properties” and make your edits. Press CTRL + O to write to the file. After making any changes, simply go back to the Minecraft screen (screen -rd) and type “stop” to stop the server, and sh ServerStart.sh to start again.
Optimizations
I’ll be discussing optimizations such as ramdisk in a future post.
Leave a Reply